- You can power the Raspberry using the USB cable alone. If you connect your A+/B+ to a power source do not connect the red lead to the Raspberry PI.
- Always read the instructions before connecting your computer to anything (DUH :-).
- Apart from how to connect the cable to the Raspberry PI the Adafruit guide:
https://learn.adafruit.com/adafruits-raspberry-pi-lesson-5-using-a-console-cable/overview
...is somewhat out of date. - The OS X driver linked to from the Adafruit article:
http://changux.co/osx-installer-to-pl2303-serial-usb-on-osx-lio/
...has issues with Yosemite, all you get when you install it and run the screen command is a blank terminal window. If you check in the console logs you will find something resembling the following entries.
28/09/15 22:28:36,000 kernel[0]: nl_bjaelectronics_driver_PL2303(0xffffff8029049800)::allocateResources failed - no fpInterface.
28/09/15 22:28:36,000 kernel[0]: nl_bjaelectronics_driver_PL2303(0xffffff8029049800)::start Allocate resources failed
28/09/15 22:28:36,000 kernel[0]: nl_bjaelectronics_driver_PL2303(0xffffff8029049800)::CheckSerialState - StartSerial failed
...the reason for this is apparently that the driver has issues with OS X kernel signing. - After growing sick and tired of trying to get this thing to work I uninstalled it:
sudo rm -r /System/Library/Extensions/osx-pl2303.kext
sudo kextunload /System/Library/Extensions/osx-pl2303.kext
and found out that there is a manufacturer supplied driver for the PL2303:
http://www.prolific.com.tw/us/showproduct.aspx?p_id=229&pcid=41
...that now supports OS X10.10 and OS X 10.11 (El Capitan). After installing it the Adafruit Serial/USB cable finally worked. Don't be fooled if you get a blank terminal window after running the screen command:
screen /dev/cu.usbserial 115200
... for some reason the 'raspberrypi login:' prompt did not appear on my system but entering the username and hitting [Return] caused the familiar 'Password:' prompt to appear. - Finally, if you get a bunch of errors like this:
Cannot open line '/dev/cu.PL2303-000013FA' for R/W: Resource busy
...or:
dev/cu.PL2303-000013FA: ioctl TIOCEXCL failed: Resource busy
It may be because you are improperly terminating the screen command. The proper way is:
[Ctrl]+[A], then [K] and finally, [Y] to shut the program down.

Monday, September 28, 2015
Getting the Adafruit serial cable to work on OS X 10.10 (Yosemite)
After trying for a couple of hours to get the Adafruit serial cable to connect to my Raspberry PI A+ I learned some lessons:

Thursday, October 31, 2013
Adding a certificate to the global certificate chain in Fedora 19
I had the worst kind of problems with Websense rewriting every single SSL certificate for all sorts of Linux terminal commands including 'yum', 'wget', 'svn' and others. Unfortunately it took a bit of research to find out how to properly fix this so I though I'd share what I found out. It's not essential to understand (roughly) what a X509 certificate is and what the difference is between PEM and DER as well as the different kinds of certificate files but it sure helps. As it turns out you can add a certificate in Fedora regardless of whether it is PEM or DER encoded but since I'm a nerd I like to know this kind of stuff. If you are impatient you can skip the next section, it is mostly technical background info.
Example 2: A certificate chain in PEM format:
Certificate files come with a confusing variety of file extensions depending on the encoding:
openssl x509 -inform DER -outform PEM -in foobar.crt -out foobar.pem
This command also works in reverse to transcode PEM encoded certificates back to ASN1 DER format.
$ su -
$ cd /etc/pki/ca-trust/extracted/pem
$ mv email-ca-bundle.pem email-ca-bundle.bak
$ mv objsign-ca-bundle.pem objsign-ca-bundle.bak
$ mv tls-ca-bundle.pem tls-ca-bundle.bak
$ cp /path/to/your/certificate/foo.pem /etc/pki/ca-trust/source/anchors/
$ update-ca-trust
The update-ca-trust command takes any PEM or DER encoded certificates you added to the source/anchors directory and adds them to your global certificate chains. You should now see a new set of certificate chains with the *.pem files extension in the /etc/pki/ca-trust/extracted/pem directory (/usr/share/pki/ca-trust-source/anchors/ on some systems) and each chain should contain a copy of your certificate. To make sure your certificate made it into the each of the new keychains just grab a random Base64 encoded line from the PEM encoded certificate you wanted to add and grep for it. The string should appear in the *.pem files but not the *.bak files:
$ grep -l BAQDAgEGMA0GCSqGSIb3DQEBDAUAA4ICAQCzV00QYk465KzquByvMiPIs0laUZx2\
/etc/pki/ca-trust/extracted/pem/*.*
/etc/pki/ca-trust/extracted/pem/email-ca-bundle.pem
/etc/pki/ca-trust/extracted/pem/objsign-ca-bundle.pem
/etc/pki/ca-trust/extracted/pem/tls-ca-bundle.pem
For more information you might want to read the man file for update-ca-trust which, unlike some other man files, is actually human readable.
A bit about PEM/CRT/CER/DER files:
Unfortunately there seems to be a bit of confusion about PEM and DER encoded certificate files. Technically speaking a certificate in PEM format is simply a X.509 certificate encoded in ASN1 (DER) encoding and then run through a Base64 encoder. Each Base64 encoded certificate is enclosed in BEGIN/END ASCII string tags. Multiple such certificates can be concatenated into a single file (using the Linux 'cat' command if necessary). This is what a single certificate and a chain of certificates in PEM format look like:Example 1: A single certificate in PEM format:
-----BEGIN CERTIFICATE-----
MIIEIzCCAwugAwIBAgIJAIjKQlbSh33iMA0GCSqGSIb3DQEBBQUAMIGnMQswCQYD
VQQGEwJVUzETMBEGA1UECAwKQ2FsaWZvcm5pYTEUMBIGA1UEBwwLTG9zIEFuZ2Vs
ZXMxFzAVBgNVBAoMDkxhenkgRHVkZSBJbmMuMRswGQYDVQQLDBJIYW1tb2NrIERl
cGFydG1lbnQxFDASBgNVBAMMC1N1cmZlciBEdWRlMSEwHwYJKoZIhvcNAQkBFhJu
b2JvZHlAbm93aGVyZS5jb20wHhcNMTMxMDMxMDgyNzIzWhcNMTYwODIwMDgyNzIz
WjCBpzELMAkGA1UEBhMCVVMxEzARBgNVBAgMCkNhbGlmb3JuaWExFDASBgNVBAcM
C0xvcyBBbmdlbGVzMRcwFQYDVQQKDA5MYXp5IER1ZGUgSW5jLjEbMBkGA1UECwwS
SGFtbW9jayBEZXBhcnRtZW50MRQwEgYDVQQDDAtTdXJmZXIgRHVkZTEhMB8GCSqG
SIb3DQEJARYSbm9ib2R5QG5vd2hlcmUuY29tMIIBIjANBgkqhkiG9w0BAQEFAAOC
AQ8AMIIBCgKCAQEArylGf3zVhGQ4MoOuNH0PqdIx43t1qjOCTF1JnQFSHjvHgKUs
iueG0PWJdHHkNACeKFBjKnHnbiri4wcNFV7Hgmz0cNVkoLcDTkXnG6JFSro8ddz0
J3LWEy8SBe4c3KXxyhxbf0L1O81Ax1vRbD9JxJXyyeoUis5YkYR37bCgnPOha2ZL
yaViDcJib3lps0m6WVx/HiXWMpP4vOU3r2dGbO19HpdLo4yFxmjVUBimz/qYk+A/
zqOVLqtYp0rU8MUPSBL1t6sbzTgpMleWEZVNPwE3xzS/DVhJwHC/q1WOMlkzRXmb
lnc3iipByxaS6cDBZ852VP3uRW7Kq8dfyceLewIDAQABo1AwTjAdBgNVHQ4EFgQU
+WANOPp+8UmNGqEy5U+M9gD5W0cwHwYDVR0jBBgwFoAU+WANOPp+8UmNGqEy5U+M
9gD5W0cwDAYDVR0TBAUwAwEB/zANBgkqhkiG9w0BAQUFAAOCAQEArCXsPaRR0gwb
kVo9y32t4j7Mf84WWfxvxnIhc31BRkl1fOhA0O6CtHMtzpRXbx2IlF2OxEsiS3Hr
6q0bkDEs+IBdw/T2xRFMj814RCQRUR3iR5yuOSnvGT6+nth1mzEP+kVpbvIQfRg2
H4qQEUWC2Bp65Tq4gVjG4difpyC+cTXxLK2Dr6IwnheXqCythO6fTKM7p1asxYc9
EbTfydorCuqhG/pUDMp0At6kqGcCYd5ZzXfD9Hopwn3AI8Nk9rEX9qfqlwXtwkQD
9j+TErlxUt+OzLRfawDECwxegCLxPU4DQt/btqAJd/7P4uCiC9Ah7i2ySWb3Dnd2
dGx4k0s26g==
-----END CERTIFICATE-----
Example 2: A certificate chain in PEM format:
-----BEGIN CERTIFICATE-----
MIIDnDCCAoSgAwIBAgIJAJmHnWWcvUFkMA0GCSqGSIb3DQEBBQUAMDcxDzANBgNV
                         **  snip **
PGC1csm4MaulhuQCWrlXVRmWFC0hVYhzAClxF/Y0gadO/SaG+G5ceXGZPpcdwjaY
9d9ljwimr1xFkeB22yXyxw==
-----END CERTIFICATE-----
-----BEGIN CERTIFICATE-----
MIIDzzCCAregAwIBAgIDAWweMA0GCSqGSIb3DQEBBQUAMIGNMQswCQYDVQQGEwJB
                         **  snip **
mYHovjrHF1D2t8b8m7CKa9aIA5GPBnc6hQLdmNVDeD/GMBWsm2vLV7eJUYs66MmE
DNuxUCAKGkq6ahq97BvIxYSazQ==
-----END CERTIFICATE-----
-----BEGIN CERTIFICATE-----
MIIFtTCCA52gAwIBAgIIYY3HhjsBggUwDQYJKoZIhvcNAQEFBQAwRDEWMBQGA1UE
                         **  snip **
r0CodaxWkHS4oJyleW/c6RrIaQXpuvoDs3zk4E7Czp3otkYNbn5XOmeUwssfnHdK
Z05phkOTOPu220+DkdRgfks+KzgHVZhepA==
-----END CERTIFICATE-----
Certificate files come with a confusing variety of file extensions depending on the encoding:
- *.pem - Certificate in PEM format (ASN1 DER and Base64 encoded). This file extension is common on Linux/Unix systems.
- *.crt - Certificate is either in PEM format or ASN1 DER encoded. Recognized by Windows and Linux/Unix.
- *.cer - Certificate is either in PEM format or ASN1 DER encoded. Alternate form of '*.crt' that is recognized by Windows.
- *.der - Certificate is ASN1 DER encoded only.
openssl x509 -inform DER -outform PEM -in foobar.crt -out foobar.pem
This command also works in reverse to transcode PEM encoded certificates back to ASN1 DER format.
Adding your certificate to the global keychain in Fedora 19
It turns out that once you know what the difference between *.pem, *.crt, *.cer and *.der files is adding your Websense certificate to Fedora's global certificate chain is pretty simple. Your Websense system administrator should be able to provide you with a root authority certificate for your Websense system. Once you have that, all you have to do is, get a root shell, copy your *.pem file to the right directory and run one command. I prefer to back up the generated keychains that shipped with Fedora 19 just in case but you can skip that step if you want to:$ su -
$ cd /etc/pki/ca-trust/extracted/pem
$ mv email-ca-bundle.pem email-ca-bundle.bak
$ mv objsign-ca-bundle.pem objsign-ca-bundle.bak
$ mv tls-ca-bundle.pem tls-ca-bundle.bak
$ cp /path/to/your/certificate/foo.pem /etc/pki/ca-trust/source/anchors/
$ update-ca-trust
The update-ca-trust command takes any PEM or DER encoded certificates you added to the source/anchors directory and adds them to your global certificate chains. You should now see a new set of certificate chains with the *.pem files extension in the /etc/pki/ca-trust/extracted/pem directory (/usr/share/pki/ca-trust-source/anchors/ on some systems) and each chain should contain a copy of your certificate. To make sure your certificate made it into the each of the new keychains just grab a random Base64 encoded line from the PEM encoded certificate you wanted to add and grep for it. The string should appear in the *.pem files but not the *.bak files:
$ grep -l BAQDAgEGMA0GCSqGSIb3DQEBDAUAA4ICAQCzV00QYk465KzquByvMiPIs0laUZx2\
/etc/pki/ca-trust/extracted/pem/*.*
/etc/pki/ca-trust/extracted/pem/email-ca-bundle.pem
/etc/pki/ca-trust/extracted/pem/objsign-ca-bundle.pem
/etc/pki/ca-trust/extracted/pem/tls-ca-bundle.pem
For more information you might want to read the man file for update-ca-trust which, unlike some other man files, is actually human readable.
Tuesday, October 8, 2013
I wanted to compile a C++11 example on OS X 10.8.5 but it took me a while to figure out how. Using good old g++ with the -std=c++11 option will not work like it does on Linux since g++ is only a symlink to llvm-g++-4.2 on OS X 10.8. Apparently the Gnu compiler is no longer installed due to license issues. What works is to use clang++, the new(ish) front-end to Apples llvm compiler and for some reason that you have to tell clang++ which C++ standard library to use. For now I'm to lazy to investigate why that is but the following compiled the C++11 example code on cplusplus.com:
clang++ -std=c++11 -stdlib=libc++ cpp11example.cpp -o cpp11example
... or you can download the Gnu compiler and install it but for a few example code that seemed like overkill.
clang++ -std=c++11 -stdlib=libc++ cpp11example.cpp -o cpp11example
... or you can download the Gnu compiler and install it but for a few example code that seemed like overkill.
Monday, May 7, 2012
Cscope on AIX 7
AIX 7 does not seem to install cscope by default. It took me a while before I found this place:
http://www.perzl.org/aix/.
The cscope packages in the AIX 7 binary section and are marked AIX 5 but they work on AIX 7 nonetheless.
http://www.perzl.org/aix/.
The cscope packages in the AIX 7 binary section and are marked AIX 5 but they work on AIX 7 nonetheless.
Friday, April 20, 2012
Ok, just set up Ubuntu 11.10, so far so good. VIM kept spitting out A, C, B characters when operating the arrow keys in insert mode. Strangely enough that was cured by copying /etc/vim/vimrc to $HOME/username/.vimrc. Other than that Unity kind of sucks but mostly because it is buggy. I don't know what all the hullabaloo regarding Unity is about, I rather liked it as a desktop environment once I had tweaked it into shape, but as I said it still needs a bit of work.
Wednesday, April 4, 2012
RHEL 6.0 network configuration.
When one selects the default minimal desktop installation RHEL 6.0 does not configure the ethernet interface. To get it working edit the file: /etc/sysconfig/network-scripts/ifcfg-eth0 and set NM_CONTROLLED="no". This ensures the device is no longer slaved to the network manager. Then restart networking:
and finally get DNS working by editing: /etc/resolv.conf
sudo service network restart
and finally get DNS working by editing: /etc/resolv.conf
search **yourdomain**
nameserver **address**
nameserver **address**
nameserver **address**
It's a workaround but it got my box connected.
Thursday, January 19, 2012
I ♥ MacBook Air
I just bought a MacBook Air (Model 4,2) and IT ROCKS!!! This is largely thanks to the SSD but the 50% weight reduction from my old MacBook also helps. Boot time is drastically shorter and Photoshop files hundreds of megabytes in size load in mere seconds. My disk space has just been cut in half to 250 Gb but I'm not complaining. The product of the last 10 years of amateur photography will just have to be farmed out to a USB disk (or a 'vagrant' as we call it up here in the arctic) and I'll find a way to live with USB 2.0 until I can afford a Tunderbolt ™ drive. Of course if history is anything to go by, and given my recent strain of catastrophically bad luck, Apple will announce a new MBA with USB 3 ports and a Retina Display tomorrow. Incidentally the Apple Genius who sold it to me my new MBA was wrong, you can upgrade the SSD in the model 4,1 and 4.2 MacBook Airs.
Arrrrgh!
The iPhone audio problem is back. The only thing that seems to help is to reboot the phone which works for a while until, once again, 'phasmatis in machina'. This seems to be a software problem so the only thing to do is wait for iOS 5.1 and hope the apple-farmers got around to fixing this bug.
Wednesday, January 4, 2012
iPhone 4S audio source problem
Had some trouble with my iPhone which refused to allow me to change the audio source while a phone call was in progress. Symptoms, with a Bluetooth headset connected:
To fix this go to Settings->General->Accessibility->Physical & Motor->'Incoming calls' (not exactly the first place anybody would think look for this setting) and change the audio source from 'Default' to 'Headset'. This causes the phone to select the Bluetooth headset as default if it is connected, otherwise the call will default to the phone and switching to speaker works reliably.
- Trying to change the audio source during a phone call causes the audio to be lost.
- For some reason the default audio source was stuck on 'Speaker' whenever a call came in.
To fix this go to Settings->General->Accessibility->Physical & Motor->'Incoming calls' (not exactly the first place anybody would think look for this setting) and change the audio source from 'Default' to 'Headset'. This causes the phone to select the Bluetooth headset as default if it is connected, otherwise the call will default to the phone and switching to speaker works reliably.
Thursday, July 14, 2011
Eigenfaces with OpenCV 2
Time to try and make this blog live up to it's domain name. I recently started playing around with face recognition. It seems there are fairly few Open Source libraries for face recognition. What I found after some searching online was:
- libface, Uses OpenCV's Eigenfaces.
- The Colorado State University FR Algorithm Evaluation suite. It includes some source code and provides the following algorithms:
- Eigenfaces.
- Eigenfaces with Linear Discriminant Analysis.
- Bayesian Intrapersonal/Extrapersonal Classifier.
- Elastic Bunch Graph Matching.
- OpenCV, provides Eigenfaces.
Since I knew nothing about face recognition I began my quest by reading a pile of CS papers* and (inevitably) settled on starting with "Eigenfaces" which is the simplest of the holistic face recognition methods. There are several tutorials on how to implement Eigenfaces with OpenCV but most of the ones I found use the C AP and not the improved C++ API. On top of that the the C++ API was redesigned which means older tutorials that used the C API cannot always be quickly rewritten.
Some years ago Servo Magazine published a fine series of OpenCV articles (made available online by cognotics.com). The series included two installments on Eigenfaces. The first installment did a good job of explaining Eigenfaces and Principal Component Analysis. The second installment presented a simple implementation. I set myself the goal of rewriting this code in the new OpenCV C++ API and testing it. I recommend reading the introductory part of the Servo Magazine article and the Eigenfaces paper by Turk & Pentland, "Eigenfaces for Recognition" before proceeding. The paper is quite well written and relatively easy to understand.
* The face-rec.org site has a papers list that is a good place to start.
Eigenfaces in the OpenCV C++ API
In the OpenCV C++ API Eigenfaces is packaged into the PCA object which in turn is neatly tucked away under array operations. This class can be used to easily implement Eigenfaces and is simpler to use than the old C API:
- PCA(const Mat& data, const Mat& mean, int flags, int maxComponents=0);
- data - The set of training faces (Γ = {Γ1, Γ2 ... ΓM}).
- mean - You can provide a pre-calculated average face (Ψ) of the set of training faces (Γ) or an empty matrix in which case the average face is calculated from the set of training faces you provided.
- components - How many principal components to retain.
- Mat project(const Mat& vec) const;
- Projects a face vector into face-space: (ωk=ukT(Γ-Ψ)).
- Mat eigenvectors;
- The eigenfaces (ω) which are the training faces (Γ) after projection into face-space.
- Mat eigenvalues;
- The eigenvectors (u) used to project faces to and from face-space.
- Mat mean;
- The average face (Ψ) .
The code
I wrote a simple program (not my cleanest code ever) that does more or less the same as the test program in the Servo Magazie tutorial did and it uses the same Cambridge University Computer Lab face database (preview here). The program was written for and compiled on a MacBook so Windows and Linux users may have to do a little tweaking of the includes and the makefile before the code compiles. The test program has several options:
eigenfacetest [-vs] [-t training image list] [-r test images list]
-v: Verbose mode.
-s: The projected face vectors can be retrieved and rendered
as images. This option shows the average face and a
few of the eigenfaces.
-r: A list of test files with faces to try and recognize.
-t: A List of training files with faces for the recognizer.
eigenfacetest [-vs] [-t training image list] [-r test images list]
-v: Verbose mode.
-s: The projected face vectors can be retrieved and rendered
as images. This option shows the average face and a
few of the eigenfaces.
-r: A list of test files with faces to try and recognize.
-t: A List of training files with faces for the recognizer.
It expects two files: train_original.txt and test_original.txt which are the files that came with the original Servo Magazine article but you can specify your own test and training file sets with the -t and -r options.
 |
| The average face on the left and three eigenfaces. |
A little experiment
Running the test sets from the original article gave me an encouraging 100% recognition rate which was way too good to be true. I decided to run the program on the entire set of test images using the first image for each individual as the training image and the rest as test images. The experiment was then repeated with two training images and eight test images etc.
| Train/Test | 1/9 | 2/8 | 3/7 | 4/6 |
| Correct | 66.4% | 75.6% | 78.6% | 85% |
The results were not quite as good as they were using the original Servo Magazine test-sets but rather consistent with what I thought they would be after reading all those CS papers i.e, that he accuracy would be between 60 and 70%. The accuracy goes up as the size of the training set increases. The accuracy with only one training image per subject is what one would expect from a simple Eigenfaces implementation and the fact that the Cambridge University face database, although small, contains a fair number of non frontal faces. The CU data set is, however, well lit and one would expect that variations in lighting conditions would cause the recognition rate to go down. To improve the results one might try further automatic preprocessing with eye detection, rotation and scaling.
Downloads
Downloads
- The source code, it's makefile and the test set lists can be downloaded here.
- You'll have to download the face database your self, here.
Wednesday, March 23, 2011
Infinity blade

The game it self has amazingly nice graphics for a mobile game, it should do since it uses the Unreal engine. The movements of the characters are also very well done and convincing. Like all of these 3D games it will burn through your iPhone's battery with blistering speed. All in all, IMHO, it's good value at € 4.99 since it's a game that's reasonably hard to master and in a sense goes on infinitely. So, thumbs up!
 |
| A fire paladin, his frozen buddy, an assassin... |
 |
| they have feral trolls, knights, robots... |
 |
| a big ugly baby, the dark knight and once you get past him... |
 |
you finally get to duel with the boss, who kicks your ass many times forcing you to start over, until you finally manage to kill him. |
 |
You don't get to keep the infinity blade, then you press a button and a hologram appears but only after you watch the credits. After all this the game starts all over again. At least you get to keep your XP and your weapons. |
Saturday, March 12, 2011
Xcode 4 and App Store access (maybe)
I just downloaded Xcode 4. Apparently Xcode is now only available through the new "OS X App Store" and the price tag is $4.99. It's not that I mind paying a token $4.99 for downloading Xcode even if it seems a bit cheap of Apple to charge money for a dev suite that used to be freely available (Microsoft charges a much higher price for anything beyond the very basic free edition of Visual Studio). What really annoys me though, is that the App Store is only accessible to residents of a select set of countries. Since I happen to live in Iceland which has up until now not had App Store access I have to jump through hoops to purchase App-Store-only software. The local press reports that we are finally going to get App Store access even if it will only include free apps and no access to media. The same source also reports that delays in Iceland being getting App Store access is a combination of us being a microstate and the fact that our fearless leaders came within a whisker of flushing the national economy down the toilet, so it's not just Apple that's to blame. Having to deal with gift card scalpers in order to be able to purchase software after investing a significant amount of money in an Apple laptop is annoying to say the least. If Apple decides to lock down OS X completely I'll be migrating to another OS. I'll put up with this kind of hoop jumping for acquiring software for an iPhone/iPad or an Android gadget but not for my desktop OS.


Tuesday, March 8, 2011
Bluetooth Headphones
The jacks on the corded headphones I use with my iPhone will usually wear out after 3-4 months so I bought a set of refurbished Sennheiser MM200 bluetooth headphones in the hope they will last longer. The sound quality is excellent and far better than what I expected from such small in-ear speakers. The MM200 doubles as a mobile headset (so far no complaints about people not hearing my voice) and as a remote for the iPhone. The skipping and volume control functions apparently did not work on earlier incarnations of iOS but they both work perfectly on my iPhone 3GS running iOS 4. Furthermore pressing the play button after powering up the MM200 connects it to the iPhone without also activating voice control on the phone unlike every other bluetooth headset I ever had. Reportedly the MM200 suffers from insufficient waterproofing that causes it to break if you wear it while exercising. I haven't experienced this in the month I have had the MM200 even though I cycle 15 km to school. The only downside is that the battery on the iPhone drains quite a bit faster thanks to bluetooth so you might want to switch off Location Services and Wifi or buy an external battery pack. The verdict so far is... thumbs up.


Thursday, February 24, 2011
iPod Photo Cache folder
I finally summoned the energy to figure out how to get rid of that annoying iPod Photo Cache folder that's been bugging me ever since I experimented with syncing some photos to my iPhone a while ago. Even after I switched off photo syncing in iTunes and deleted the iPod Photo Cache folder the damn thing would reappear on my desktop every time I connected the phone to my laptop. The trick is:
- Connect your iPhone/iPod to your Mac.
- This step is probably unnecessary but I'm paranoid. Back up the photos from your iPhone with the Image Capture utility. Not a perfect tool but it allows you to pull photos from your iPhone to a plain old directory and organize them your self which I like better than using iPhoto.
- Navigate to the "Photos" tab in iTunes.
- Check "Sync photos from" and expand the drop down box next to that text. Apparently the photo cache gets re-created in the folder chosen here every time you connect your phone even after you disable photo syncing.
- Select some other out of the way folder, even an empty one. I created an empty folder "~/Pictures/iPhone Sync".
- Apply the changes and Sync the empty folder once and then deactivate Photo syncing.
This cured the issue for me.
Monday, September 13, 2010
Looking for a bargain? Try the MacUpdate Bundle...
I decided to buy the new MacUpdate Bundle and surprisingly I didn't regret it five minutes later like I usually do after an impulse purchase.

I can find a use for all of these apps but the highlights for me are Mind Node Pro, Backup Pro, Espionage, ShareTool and Toast 10 Titanium in that order. The offer expires in 9 days from the time of writing so don't wait too long.

For $49.99 you get $443 worth of apps and if you are one of the first 20.000 buyers you get two bonus apps. The loot is as follows:
 | ShareTool from YazSoft - Securely connect to your home or office network via Bonjour from any location. |
 | Backup Pro from Belight Software - Synchronization and backup utility that gives you more options that Time Machine does. |
 | Voila from Global Delight Technologies - Capture and record, edit, annotate, organize and share images and video. |
 | Espionage from Tao Effect - Not quite what the name suggests, this is an encryption application. It lets you encrypt and password protect individual folders and files. Integrates with Finder and various other applications. The app also features an auto backup feature. |
 | My Living Destop from Amuse Inc. - Does just what the name says, features 25 different scenes and lets you import your own videos. Also includes a video screensaver. |
 | Mind Node Pro by Markus Müller - Mind mapping application. Pretty straight forward and most of all simple, quick and easy to use. Just the way I like it. |
 | Toast 10 Titanium from Roxio - This hardly needs introduction, standard CD & DVD burning suite for OS X. Ships with a gaggle of secondary utilities including a Disk Cover editor. |
 | Concentrate - Workflow and productivity app that helps you streamline your workflow. Does things like block distracting websites and lets you define an activity and launches the apps and websites required. |
 | Cashculator from Apparent Software - Who doesn't need to organize their finances? The interface is clean, simple and intuitive the only data export option is *.csv format. This forces you to do use Excel's lame import wizard if you ever feel the need to do analyze your expenses with a heavy duty app. It would be cool to have an iPhone/iPod counterpart for this CashCulator. |
 | Live interior 3D standard from Beligth Software - Easy to use 3D interior design app. Not exactly something I'll use a lot but it looks pretty impressive. |
 | Bonus: Vitamin R from publicspace.net - A productivity app that basically aims to help you to organize your tasks and increase your productivity using time-slicing. |
 | Bonus: Compartments from LittleFin software - A Home Inventory program. Need to organize your possessions? |
I can find a use for all of these apps but the highlights for me are Mind Node Pro, Backup Pro, Espionage, ShareTool and Toast 10 Titanium in that order. The offer expires in 9 days from the time of writing so don't wait too long.
Tuesday, September 7, 2010
Steve Jobs zapped my iPod icon
My old iPod used to appear as an icon, like a USB drive, on my desktop when I plugged it into my MacBook which allowed me to eject the thing irrespective of which space I was in by simply going to the desktop selecting the thing and hitting [CMD] + [E]. When Apple removed that feature it annoyed me somewhat since I now had to switch spaces, find the iTunes window, locate the iPod (or iPhone these days) and eject it. I wasn't too fond of the idea of using one of those menu applets (although there are some nice ones) so I finally got around to creating a little application that ejects the iPod.
Fire up the AppleScript Editor:

Copy the following code into the edit window:
Save the script with the following settings:

Fire up the AppleScript Editor:

Copy the following code into the edit window:
1:  tell application "iTunes"
2:      repeat with s in sources
3:          if (kind of s is iPod) then eject s
4:      end repeat
5:  end tell
Save the script with the following settings:

Finally let's change the default icon, the easiest way to achieve this is to click the "Bundle Contents" button in the upper right corner. Delete the applet.icns icon using the right click menu, drag and drop the Eject iPod.icns file (which you can download here) into the "Bundle Contents" pane and rename it to applet.icns. Finally save the AppleScript app again. I like to keep this thing in the dock although I ususally prefer to run it through Spotlight which is the reason I created this app in the first place. Quick and easy. If you are lazy you can also download this crappy little app here.
Friday, June 11, 2010
Integrating Doxygen with Xcode
I recenty went looking for a good tool to document my Cocoa project and quickly found out that there seem to be two widely used documentation generators for Objective C:
Unfortunately there are a few problems with Apple's tutorial. Firstly, the Run-Script they provide fails if you have a space in your project name or any of the file system paths you are using. Secondly, I didn't like the way the script configures Doxygen. Thirdly, the script in Apple's tutorial simply appends lines to the Doxygen configuration file which means those lines are duplicated in the file.
Step 1. Installing Doxygen
There are two ways to instally Doxygen. You can either install the Doxygen GUI application for OS X or you can also compile Doxygen from source. Binaries, sources and compile instructions are available on the Doxygen the project downloadpage.
Step 2 - Xcode integration
Once you have installed Doxygen on your Mac you have to configure Xcode. There are a few tasks you must perform:
Step 2.1 - The Run-Script
I rewrote the script from Apples website so that it can now handle spaces in directory paths. It also uses sed for substitution rather than appending lines to the script. You must donwload the script before proceeding.
Once you have dowlnoaded the script you have to create a new Xcode target. Unfold the “Targets” item in the Xcode project navigator, right click it and select “Add > New Target...”.
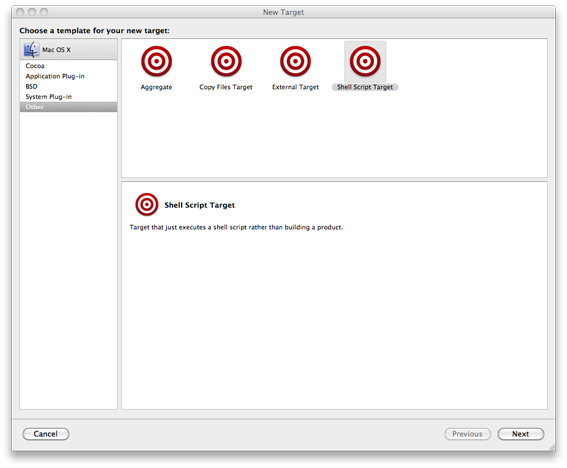
In the “New Target” window select “Other” and “Shell Script Target” and click “Next”. This should take you to a new window. Name the target “Generate Docs” and click Finish.
You could also have created this Run-Script item under the Xcode Target that builds your application. This has the advantage that the documentation gets built every time you build your app. There are two downsides to this approach:
I recenty went looking for a good tool to document my Cocoa project and quickly found out that there seem to be two widely used documentation generators for Objective C:
- HeaderDoc - A Documentation utility maintained by Apple.
- Doxygen - A widely used open source document generator.
Unfortunately there are a few problems with Apple's tutorial. Firstly, the Run-Script they provide fails if you have a space in your project name or any of the file system paths you are using. Secondly, I didn't like the way the script configures Doxygen. Thirdly, the script in Apple's tutorial simply appends lines to the Doxygen configuration file which means those lines are duplicated in the file.
Step 1. Installing Doxygen
There are two ways to instally Doxygen. You can either install the Doxygen GUI application for OS X or you can also compile Doxygen from source. Binaries, sources and compile instructions are available on the Doxygen the project downloadpage.
Step 2 - Xcode integration
Once you have installed Doxygen on your Mac you have to configure Xcode. There are a few tasks you must perform:
- Create a new Xcode Target and an associated Run-Script item which you’ll use to trigger document generation.
- Add a couple of User-Defined Settings (a couple of environmental variables the shell script embedded in the Run-Script item will read).
- Install the script text into the Run-Script item.
- Modify the Doxygen configuration options in the script.
Step 2.1 - The Run-Script
I rewrote the script from Apples website so that it can now handle spaces in directory paths. It also uses sed for substitution rather than appending lines to the script. You must donwload the script before proceeding.
Once you have dowlnoaded the script you have to create a new Xcode target. Unfold the “Targets” item in the Xcode project navigator, right click it and select “Add > New Target...”.
In the “New Target” window select “Other” and “Shell Script Target” and click “Next”. This should take you to a new window. Name the target “Generate Docs” and click Finish.
You could also have created this Run-Script item under the Xcode Target that builds your application. This has the advantage that the documentation gets built every time you build your app. There are two downsides to this approach:
- It can take a long time to generate the documentation and rebuilding it every time you build the app is unnecessary and lengthens your build time even when you didn’t modify your Doxygen comments.
- For some reason it is sometimes necessary to restart Xcode before it becomes completely aware of the new docset. You can still activate the docset and browse it in the Xcode documentation browser but the search function may not work optimally.

Step 2.2 - Create User-Defined Settings
When you closed the “New Target” wizard Xcode should have taken you to the “Target ‘Generate Docs’ Info” window. If it didn’t you can right click on you new Xcode Target and select “Get Info”. In the Info window select the “Build” tab and add a couple of new User-Defined setting using the drop down box in the lower left corner of the window.

Create the following User-Defined Settings:
- DOXYGEN_DOCSET_BUNDLE_ID - This will become the name of the docset bundle, for example like a java style package name: 'com.yourorganization.yourproduct'.
- DOXYGEN_PATH - This setting points the script to the location of the Doxygen command-line binary. Binary install locations are:
- If you downloaded the Doxygen GUI app: /Applications/Doxygen.app/Contents/Resources/doxygen
- If you build Doxygen from Source: /usr/local/bin/doxygen
Step 2.3 - Script installation
Expand the “Generate Docs” target you just created, right click it and select “Get Info”. Now open the script you downloaded above, highlight it and copy the script text and paste it into the script field in the Info window.

Step 2.4 - Modify Doxygen settings in the script
The settings in my version of this script are a bit different from the ones in the script provided by Apple which pretty much uses the default Doxygen configuration and which does not behave the way I want it to. With the default settings Doxygen will document methods that I want to keep hidden from the user. So far the only way I have discovered to change this behaviour is to make sure that the following Doxygen configuration options are set as follows:
This causes Doxygen to hide all classes, methodd and other constructs that are not explicitly documented with comments. This also forces the user to explicitly comment/document all classes, methods and other constructs that he wants included in the docset.
Changing these settings as follows:
Setting EXTRACT_ALL = NO will cause the settings for HIDE_UNDOC_MEMBERS and HIDE_UNDOC_CLASSES to be ignored and causes Doxygen to include absolutely everything in the docset it produces. This includes summaries for *.m files but excluding private and static file members.
There are a few more interesting configuration options:
Quirks
In conclusion I thought I’d include a few Doxygen quirks that I discovered while using this setup.
/** @file FooClass.h
The settings in my version of this script are a bit different from the ones in the script provided by Apple which pretty much uses the default Doxygen configuration and which does not behave the way I want it to. With the default settings Doxygen will document methods that I want to keep hidden from the user. So far the only way I have discovered to change this behaviour is to make sure that the following Doxygen configuration options are set as follows:
- EXTRACT_ALL = NO
- HIDE_UNDOC_MEMBERS = YES
- HIDE_UNDOC_CLASSES = YES
This causes Doxygen to hide all classes, methodd and other constructs that are not explicitly documented with comments. This also forces the user to explicitly comment/document all classes, methods and other constructs that he wants included in the docset.
Changing these settings as follows:
- EXTRACT_ALL = NO
- HIDE_UNDOC_MEMBERS = NO
- HIDE_UNDOC_CLASSES = NO
Setting EXTRACT_ALL = NO will cause the settings for HIDE_UNDOC_MEMBERS and HIDE_UNDOC_CLASSES to be ignored and causes Doxygen to include absolutely everything in the docset it produces. This includes summaries for *.m files but excluding private and static file members.
There are a few more interesting configuration options:
- REPEAT_BRIEF = YES - Repeat @brief descriptions in the extended class and method descriptions.
- JAVADOC_AUTOBRIEF = YES - Insert @brief descriptions into the class member list at the top of each class reference page.
- INLINE_INHERITED_MEMB = YES - Causes inherited methods to be included in the class reference pages for child classes.
Quirks
In conclusion I thought I’d include a few Doxygen quirks that I discovered while using this setup.
- If you use HeaderDoc style comments (/*! comment */) the body of the comment will be assumed to be an extended description, if you use Doxygen/Javadoc style tags (/** comment */) the body of the comment will is assumed to be a @brief description. This means that if JAVADOC_AUTOBRIEF = YES, REPEAT_BRIEF = NO and you are using Doxygen style comments the method description is only inserted into the javadoc autobrief list. To get the brief in both places set YES, REPEAT_BRIEF = YES.
- Doxygen puts documentation for #define clauses into the header file description. If you set EXTRACT_ALL = NO you will find that header file documentation is only generated if you insert the following Doxygen commands into the header file:
/** @file FooClass.h
@brief testing defines
This is to test the documentation of defines.
*/
@interface FooClass : NSObject{
double barVar;
}
/** @def KSGL_VECTOR_CLOCKW
@brief clockwise rotation.
*/
#define SOME_DEFINE 1
Subscribe to:
Posts (Atom)